Foreword
This guide was originally written by Xmo5 and posted on the Take Your Turn forums as "Map Making Guide I: Introduction to AWBW Map Design". As a Map Making Guide II was not written, the title has been abbreviated. Some modifications to the images were done for the purposes of site formatting.
Introduction
As a new map maker, sometimes the AWBW community can seem harsh or narrow-minded when it comes to reviewing or commenting on maps. It might seem that no matter how hard you work on a map and no matter how proud of it you are, people still have bad things to say. Honestly, just about everyone here has had that experience, myself included, but believe it or not, the feedback is rarely meant to be as cruel as it sounds, in fact it's commonly meant to be constructive. That said, it’s important to make sure everybody’s on the same page when it comes to understanding what makes a map “good” or nobody will ever agree on whether feedback is constructive or unnecessarily harsh.
I realize there are lots of different preferences out there in terms of the types of maps people enjoy the most, but my goal here is to help you gain an understanding of what factors generally go into designing a fun and fair map for AWBW and why these are factors worth considering to begin with. Some are more significant than others, but it’s important to understand that these are deep-rooted concepts based on years of collective experience of the AWBW community, so a lot of thought and testing has gone into how each one will impact gameplay.
Now don’t get it twisted, I don’t want to tell you exactly what to do so you can crank out the same maps as everybody else. Quite the contrary, I want to help you understand different aspects of the design process and learn what factors to consider and then let you implement what you learn in your own unique way. In other words, everyone has their own style and preserving that style is important, but this guide will help you learn how to use your style in a way that will be fun, balanced, and admired by your fellow AWBW mappers and players.
Map Design Step 0: Basic Factors to Consider
You might say:
Hey, I’ve been playing Advance Wars for years and I’ve made a ton of design maps in my day; why is AWBW any different? Aren’t you people being a little strict about it?
and, again, you wouldn’t be the only one. I think most people who come to AWBW feel this way and I can understand why (I was there once, remember?). The problem is that designing maps for AWBW is very different from designing maps in the original games and so it needs to be approached in a different way. The primary reason for this is simple: The maps you design here will never be played against the AI and are instead going to be used exclusively by the AWBW community. The fact is that playing against another person, especially in a competitive environment, is a lot more difficult because people are great at figuring out how to take advantage of any little imbalance that will work in their favor.
As a result, playing against other people means that everything has to be as fair as possible and that means considering a lot of things you might not have previously thought of. The first and biggest stumbling block for almost all new map makers is the concept of First Turn Advantage, or FTA. Basically it boils down to this: Advance Wars is a turn based strategy game which means somebody has to go first. Unfortunately, this simple fact creates a very fundamental imbalance which we need to correct for in our map designs. There’s a lot of information to cover on FTA and how to counter it, so I won’t get into that here. Instead, I recommend you read my series of guides devoted entirely to the topic, starting with FTA Guide I: Introduction to FTA to get a better understanding because it plays such a crucial role in map making.
Another really important thing to do, especially as a new map maker, is to design all of your maps symmetrically. I know, I know, that’s sooo boring, but believe me, you can make great maps that way and it solves many of your balance issues for you automatically. With that said: Yes, asymmetrical maps can be made and yes they can be balanced in theory, but they take a lot of work, a lot of understanding, and a lot of experience to make correctly. It’s like the difference between building a go-kart and building a Lamborghini.
They both work on the same basic principles, but one’s a lot harder to design than the other, and until you have a good grasp on how to make the go-kart, you should hold off on the Lambo. Also, keep in mind that looking like a Lamborghini and driving like one are two very different things: Even when they look good, asymmetrical maps usually have a lot of underlying balance issues. This is why most people stick to symmetrical maps and why I recommend building a very strong understanding of map design principles before attempting anything that advanced.
While we're on the topic of symmetry, it’s good to mention that there are three main types of symmetry you can use, each of which will have a different impact on how your map looks and plays. The three types are mirror (left/right or top/bottom), diagonal, and rotational ("2-" or "4-corner"), as shown below:
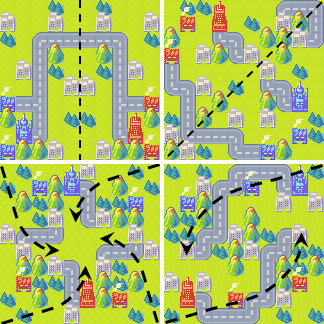
Mirror symmetry can tend to look somewhat bland and both diagonal and 4-corner rotational symmetry require the map to be a square. Since mirror and diagonal symmetry have identical fronts from both sides, the battle is more likely to be bland or even stalemate. 2-corner rotational symmetry tends to be the best for interesting gameplay because it allows the armies to approach a given front from different angles at different rates with different offensive/defensive considerations, opening the door to much greater variety in units and strategies.
Finally, before you place your first mountain, city, or forest, you need to decide your map dimensions. The shape and size of your map will have a major impact on how the game will unfold and what other options you have in your design. Typically, for 2-player maps, anything 25x25 or greater is considered a large map, while 15x15 would be small. Generally speaking, the larger the map, the longer the game lasts, the longer before combat begins, the higher the funding/unit variety, the more terrain variety options, and the longer it will take to complete your turn. Most competitive style maps are medium sized because it cuts down on long games or turns, but allows for enough variety in units/terrain for interesting battles and strategies.
Alright, with those basic principles out of the way, let’s walk through the design process and consider what types of consequences different decisions might make.
Step 1: Terrain (Laying the Ground Work)
Once you have your map size set, you can start placing terrain. While it may normally just seem like the background of the battle, it’s a very useful tool in shaping how the battle progresses and determining what types of strategies/units are best. Here’s an overview of how different types of terrain impact the map:
- Plains- These are your bread and butter and sort of represent a “default” space; they’re usually what you compare against when looking at other terrain types. Movement is pretty easy across them, but they can slow down wheeled units like rockets and recons, and while they offer some defense value, it’s minimal. They’ll probably make up a lot of your map, but having too many plains makes it look bland and open.
- Forests- Adding some forests can greatly improve the aesthetics of your map and they can be useful in directing units or slowing them down; units will travel the “path of least resistance”. Forests also offer a nice defense boost so they can be good next to cities, for example, if you want it to be more practical to try and dislodge an enemy unit. In fog of war, forests also offer a place to hide. Forests will be common on your maps, but too many forests is a bad thing! They choke out the battle by making movement slow, defense high, and vision low.
- Roads/Shoals- Both roads and shoals sort of act the opposite of forests; they improve movement but at a lower defensive value, making units vulnerable. You can place them in ways to encourage quick and easy travel, but if not used carefully, they can open up the door to what we call recon-rush, or sending an early recon to disrupt the capture of key properties. Keep in mind that nobody wants to attack or defend from a road/shoal so poor placement of these tiles can sometimes lead to standoffs. Shoals also serve as places to unload landers/blackboats which can be an interesting way to move units around.
- Mountains, Rivers, and Oceans- For most maps, these three types of terrain serve the same general purpose: shaping the map/fronts by making a barrier that (most) land units can’t cross but air units can. These terrain types will really define your map the most because they directly carve out the paths that lead to the enemy and to key properties. They can also assist players in building a defensive formation by blocking off an attack angle from land units. Small changes will usually make big differences here.
- Pipes/Seams- Pipes are the ultimate barrier to prevent any unit from passing; use in moderation! Place strategically to gain control over where air units can go and how quickly they get there. Pipe seams are great for delaying access to certain properties or for opening up paths later on in the game if the battle gets too stale. Also, while many of you may be tempted, it’s very rare to find a successful use of piperunners, so I would suggest keeping them out of the picture when designing your maps.
Okay, so now you want to piece all of this terrain information together in a way that makes a fun and interesting place to battle. Firstly, aesthetics do count for something, so using a good variety of terrain types and colors is recommended. For the same reason, it’s a good idea to keep the terrain from being too clumpy or bunched in one spot, but also from being too spread out and evenly distributed. Aesthetically pleasing maps incorporate different terrain types in natural, irregular ways. See these for comparison:
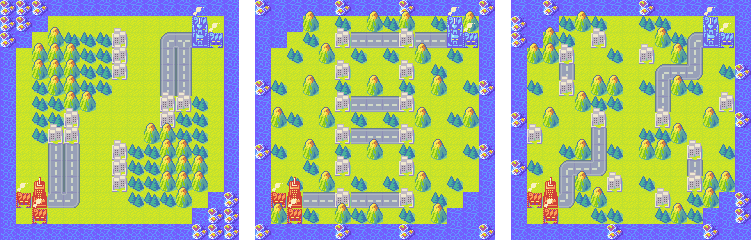
Each map has the same number of forest, city, road, mountain, and reef tiles, but the first has them clumped together, the second has them spread more evenly, while the last mixes the two. This mix is what looks the most natural and aesthetically pleasing. Another factor to consider that you can see from my example here is that flat, straight edges are not aesthetically pleasing so try to avoid them.
If you look more carefully at this example, what you’ll see is that you actually gain more than an aesthetic benefit: Gameplay is greatly improved with the last version because it has more fronts and offers more paths to the fronts. The arrows below show the possible choices, comparing the first map with the last:

Having more fronts and more paths to the fronts helps promote overall planning and strategy while also giving the battle a more natural flow. I mean, if you know all your opponent’s units will be advancing straight up the middle, isn’t it a little boring to try and defend against them?
You can also encourage unit variety by trying to make different areas favor different units. Each unit is best in different situations, so by having a good balance of open areas and moderate chokepoints you make a wider array of units useful. The differences can be subtle and still have a big impact on gameplay, so don't aim to make epic chokepoints or wide open fields.
Step 2: Adding the Properties
Adding properties might seem pretty easy once you have the terrain set up, but property placement and quantity is very important. First, you want to make sure that you have the right amount of bases for your map size. Usually you don’t want your map to have more than 2 bases supporting any given front and you don’t want any given base responsible for more than 2 fronts. Too many bases per front leads to infantry spam and too few leads to sparse unit count, generally consisting mostly of more expensive units and fewer infantry.

Here, the lone base supports two fronts while the two bases primarily support one front, but can choose to support the middle front less efficiently with the lander. Also note how the neutral airport will help on both of the fronts belonging to the lone base.
Once you’ve decided on a number of bases, you need to decide on the right income for the number of production facilities on your map; we measure this with the “funds to base ratio”. 5-7k income per base is typically a comfortable range for a medium sized map so you can use that as a baseline. On maps with airports or ports, you should probably add a couple extra cities to support the higher cost of air/sea units. Similar to to base:fronts situation, a low funds:base ratio will probably look like a crowded sea of infantry while a high funds:base ratio will make it hard to form a defensive wall because units are more sparse and more powerful. Either extreme makes strategic battles nearly impossible.
Beyond those basic guidelines, here are some of the main “dos and don’ts” of placing properties:
Don't...
- ...place enemy production facilities (bases/airports etc.) within one move of each other. This adds to FTA and makes for an uninteresting battle.
- ...place excessive amounts of pre-owned properties or units. This adds to FTA, so try and stick to no units and only two pre-owned bases plus an HQ.
- ...add more than 1 tower per side unless you have a really good reason. Sometimes heavy terrain can be addressed by having 2 towers per player, but in most cases it just makes units overpowered to the point that forming effective defensive lines is difficult.
- ...clump a lot of properties together. Just like other heavy terrain, this can make the battle more bland and make it too hard to advance because of how easy it is to defend.
- ...make it so that production facilities can be easily “locked” by enemy artillery, rockets, battleships, missiles, or carriers. This adds to FTA and makes for an uninteresting battle.
- ...use silos at all, if possible. If you must, silos are best in very small quantities and in areas that require additional effort to acquire. Silos add to FTA and can be extremely disruptive to the flow of the battle, especially early in the game.
- ...place an odd number of neutral properties or place neutral properties exactly halfway between opponents. This adds to FTA because whoever captures the property first usually gains an advantage that is hard to reverse.
- Definitely don’t place an odd number of neutral bases/airports/ports etc. This is the same as above, but the advantage is virtually always game-ending.
See how many of those don'ts you can find in this example map:

Do...
- ...try and limit the amount of dead space or ignored territory on your map. You want to make the most of the space you have, so consider adding key properties like towers or labs in interesting places to draw more attention and encourage conflict in those areas.
- ...make sure there are properties near the frontline to encourage both players to advance. When there’s something to be won, players will try to push forward, but empty no-man’s-land favors turtling and standoffs over advancement.
- ...make sure that the key neutral properties belonging to each player can be captured before the opponent can interrupt to gain an advantage. Watch out for that recon rush!
Look at this map uses the list of do's and don'ts to place the properties expertly:

Step 3: Checking the Map Over
At this point, you’ve placed just about everything you’ll need on the map and it should be complete. However, just because it seems done, doesn’t mean you should skip the last important step of checking your work before publishing! Here are some of the things to watch out for when you think you’re finished:
- Do you have any “typos”, such as a misplaced tile or two?
- Do there appear to be any imbalances you missed during the design phase?
- Did you remember to place your FTA counter, and are there any flaws with it?
- Are any CO’s much stronger than normal here? (Pay extra attention to CO’s like Sturm, Sami, Javier, Sasha, Rachel, Lash, and Kindle. See Taz's (partial) CO Usage Guide and Hellraider's AWBW CO Tier List for more information)
Also, while it may seem trivial, does your map look nice? Does it look fun to play on? It’s more enjoyable to play on a map that looks good than it does to play on a similar map with no attention to aesthetics. Don’t be afraid to try out a couple different versions to see what looks best.
Step 4: Publishing, Comments, Criticism, and Feedback
Now you’re done and you can publish the map, but just because it’s published doesn’t mean your job is done. First thing’s first- it’s good practice to leave a comment on your own map when you publish it so you can mention recommended game settings or special rules and walk through your thought process so people know what they’re supposed to be looking at. This goes a long way towards getting helpful and relevant feedback. Also feel free to get creative and give your map some backstory! Is there history behind these warring factions? Have fun with it and other people will too.
After that, your map may get some commentary and sometimes the commentary is critical. In this situation, the best thing you can do is try and meet the criticism with an open mind and see if there’s any validity to it, even if the critics are a bit harsh. When in doubt, start a discussion about the topic, not an argument- maybe one of you was overlooking something and a brief friendly discussion will resolve things quickly and peacefully. On the other hand, if you aren’t getting any/enough feedback, you can always send a PM to one of the Map Committee members or write a post on the Design Maps subforum to request feedback.
Of course, the best way to figure out if there are problems with the map is to test it. Test it as many times as you can with different people and pay attention to how the game unfolds. Are there things you didn’t like? What caused problems? Is there anything you can do to fix it? If you don’t know how to fix something, ask a Map Committee member or post on the forum and people will be happy to help. Anything you see as an improvement based on feedback or testing is a good edit to make, but like before, it’s a good idea to leave a comment on the map to mention what you changed and why.
Alright, that should cover the basics! You have just about everything you need to start churning out masterpieces, so feel free to try out all your new moves. If you want more advanced tips and a deeper analysis of good map design practice, check out the next guide in the series- Map Making Guide II: Advanced Level Course (coming attraction). Class dismissed!