0. Foreword
This document was written by Xph aka LostinThought. By request, some rewriting and reformatting has been done, both for clarity and for the purposes of converting the document into a format this site can handle. As an additional condition for rehosting, I also am obligated to shoutout to Simpleflips.
1. Tactics 101: An Overview
Tactics, in this case, refers to short-term plays - primarily of the 'what do I move where to get the most out of this turn' variety. This guide will not cover long-term strategies such as build orders, capture phases, CO power management or weighing up income advantages against unit value.
Note that, while most of this guide consists of fundamentals that will carry over into any gamemode, it was primarily written with standard rules in mind.
2. Defensive Tactics: How to Not Lose Your Army
If your unit is struck first, it attacks first. This typically means that an attacker takes less damage than a defender in an otherwise equal fight - this makes blindly moving units a bad choice, and means that we'll have to take some precautions if we want to safely move our units forwards.
2.1. Staying Out of Range
Sometimes, particularily early on in a game, the easiest way to avoid taking first strikes from tanks or opposing infantry is to simply stay away from anything that can hurt your unit. Staying aware of and keeping your unit just outside the opponent's attack range (which consists of any space adjacent to their movement range) ensures that you won't get hit, and that they can't come closer without being at risk of a first strike themself (This is typically referred to as zoning them out, more on this in chapter 4).
However, we can't stay outside their units' range forever - the opposing units , and eventually we'll need to approach their units - and to approach into their range safely, you'll need to...
2.2. Defend Your Units
This means covering your units against anything in range that can attack them. The opposing attackers will suffer more damage in your turn than they deal. To cover against:
- Tanks: Another tank, artillery, bigger tanks if available, mechs.
- Big Tanks: Your own big tank, artillery, air units
- Bcopter: Your own bcopter*, AA
* Not vs Andy or Sonja SCOPs
Notably, a tank on an owned city can defend itself from one opposing tank, and the same applies for an infantry defending itself from an infantry - however, this doesn't work well against COs with large firepower differences (Kindle, Lash on 3*+ terrain) or on charged powers, and you'll want to avoid getting said self-defending unit hit twice in the same turn unless you have backup around.
2.3. Meatshielding
This is blocking the path between the opposing attacker and your own valuable units, with units of lesser worth. If their only threat to your valuable unit is needed to kill the meatshield, they can't use it to hit the valuable unit.
2.4. Building Walls: How to Become the Next 'Greatest President of All Time'
Essentially an extension of the previous point, a wall consists of a larger number of adjacent meatshields that protect each other and units behind them.

In this example, the opponent attacking from below will be unable to gain an advantage or break even by attacking - as they'll be required to use large parts of their firepower on breaking through the meatshields, the counterattack after such an initial strike will strongly outweigh the initial damage an opponent will reasonably deal.
Of course, most walls will not be as clean and unbreakable as this one - as such, here are some suggestions to minimize the risk and damage of being wallbroken:
-
The less angles the opponent can attack from, the better. It's much harder to remove a unit in one hit than in two, and the easiest walling formation typically consists of a straight horizontal or vertical line of units, which leaves each unit only attackable from one single space.
-
Walls are only as strong as their weakest point - Any unit that can be removed opens up more angles of attack on your wall. Keep this in mind when picking which units to use as cornerstones or in especially significant spots.
-
giving the opponent extra room to maneuver amplifies the above - Having many free spaces between your units will typically make wallbreaks more punishing, as it once more opens up more attacking angles.
-
Mind the terrain. Higher defenses obviously lower the chances of your opponent being able to break your wall, and mobility-limiting Chokepoints make walling alot easier.
-
Consider the opposing CO's abilities. Even a wall that would normally be safe may be broken through with the aid of CO powers or significant day-to-day firepower boosts.
3. Offensive Tactics: How to Make Sure the Opponent Loses Their Army
Now that we have an idea how to not lose the game, it is time to learn how to win it. Alot of the ideas covered in this section are the inverse of what was covered in the previous section - this is because the easiest way to gain an advantage is typically to notice openings within the opponents' defense and abuse them.
3.1. Safe Attacks
Free hits, riskless attacks, come in two kinds:
- Undefended Units: When they literally cannot fight back. The easiest and simplest way to win out on an offensive move is to make sure your opponent can't hit you back. "Undefended" doesn't necessarily mean that your opponent can't have any units nearby, but that none of their nearby units can deal significant damage to your attacker. This typically happens most frequently early into the game, with tanks getting free hits on infantry in the capture phase, but even later on air units can maneuver themself into safe attacking situations sometimes.
- Covered Attacks : When they shouldn't fight back. Attacking with properly defended units, think tank with nearby AA in range striking their infantry despite opposing bcopter. This can lead to trading sequences in less clear-cut positions. Think in advance.
3.2. Taking Out Defenders
Strike multiple of their units so they can't defend each other. For example: Taking out an AA with a tank sacrifice so your bcopter/bomber rules the sky for 2 turns.
3.3.1. Blocking
Sometimes it's also possible to block opposing units from defending or avenging other opposing units. As an example:
While we could deliver a 2hko onto that unsuspecting tank, we'd end up with our bcopter in the range of their AA - while the trade sequence would eventually be slightly in our favor anyways, we can do better if we use call our nearby infantry to help:

Blocking is the art of making otherwise unsafe attacks safe through the use of meatshields. This is typically done by placing a unit on the square that the opposing unit was occupying.
3.3.2. Entrapment: The Offensive Meatshield
Before we move on to the advantage state section, there are two especially notable traps when it comes to apparently positive attacks - these cause safe looking hits to be unsafe. The first one consists of some CO powers, most notably Andy's and Hawke's. These won't be covered in this guide, but keep opposing COs in mind when attacking.
The second one, however, is universal. Let's just look at the game and see:

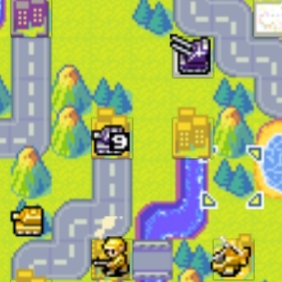
It's Yellow Comet's turn, and their battle copter is soaring through the skies as it spies some undefended infantry on the horizon, with the nearby AA not covering either! It moves in and takes a free shot, and…

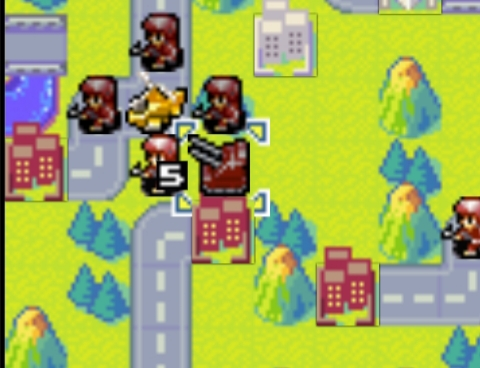
...dies. It's a trap, indeed.
Entrapment can be seen as an offensive spin on blocking - the idea is to block an opposing unit's escape route as its counters move closer. With the large number of involved units and necessity to keep them alive or allow the trapped unit to escape, this is probably the hardest one of the offensive maneuvers outlined in this guide to both notice and apply. However, it's important to know about it, and to consider whether this maneuver is possible for your opponent whenever you attack into larger groups of units or choky terrain - or whether you can trap an unsuspecting opposing unit.
4. Gaining an Advantage: How to Get to do All That Fancy Stuff in Section 3
So far, we have covered some of the different offensive and defensive patterns you'll see the most - to make full use of these, your aim is to utilize the given defensive tactics to safely place your units as aggressively as possible. Aggressive placement in this case means covering as much contested area as possible with your units, while avoiding giving your opponent the openings outlined in the offensive section. This is much easier said than done, of course, and typically requires a positional advantage in one area - in other words, either having more vehicles on one front or having your vehicles in better placements. This chapter covers ways to achieve both of these.
4.1.1. Positional Advantages and You
Whenever you can freely choose where to place your unit, such as when you're sending reinforcements from your factory towards the front you should aim to have each unit reach and control as much contested area as possible. Contested, in this case, means the parts of the map that both players will fight over - this is typically the area in the middle between both players. This maximizes the chance that your unit will be able to do something useful in the next turn.
Typically, this position will be towards the center of either the whole map or the front you want your unit to fight on.
4.1.2. Vehicle Advantage: haha Tank go brrrr
Note that while it is named a vehicle advantage, this can go for infantry on some map areas. Covering a front with more vehicles than the opponent, creates more ways for them to defend each other, which means more safe attacks.
4.2.1. Front Switching: Being in Two Places at Once
[Ed. note: Section left unwritten.]
4.2.2. The Center
[Ed. note: Section left unwritten.]
5. End Notes
-
It may not always be long-term advantageous to take every apparently positive trade as they're outlined in this guide, so stay cautious and consider your opponent's responses to your moves. It can sometimes be advantageous to ignore material advantage in favor of a larger positional advantage, too.
-
Consider the effects of any CO powers that are reasonably able to be activated on this or your next turn. A wall may be broken much easier if the opponent raises their attack or applies mass damage to your units before striking, and getting significant units first struck due to not zoning around a +movement COP can be devastating - on the other hand, your own incoming powers may allow you to make some more aggressive plays even shortly before they're able to be activated.